How to Upscale Images: Real-ESRGAN, Magnific V2, ComfyUI in 2026

TL;DR
- Match the upscaler to the input class — generated, degraded, editorial, or batch — not to the brand on the loading screen
- Tiled pipelines exist because no consumer GPU holds a 6K latent — your spec must define tile size, overlap, and seam validation
- “Looks better” is not validation — check edges, textures, text and logos, structural fidelity, and tile boundaries on every output
A creative director hands you a 1024×768 product hero. Print needs 6000×4500. Someone fires up Magnific Precision V2 and burns through the month’s tokens. The output is sharp, glossy, and slightly the wrong product. Fabric weave reinvented. Logo curve subtly off. The model did exactly what it was specified to do — invent detail. You wanted preservation. Wrong tool, wrong spec. The fix is two rules upstream: classify the input first, then pick the family whose specification matches what you’ll tolerate.
Before You Start
You’ll need:
- An AI upscaler — Real-ESRGAN locally, Magnific Precision V2 hosted, Topaz Gigapixel desktop, or ComfyUI for custom pipelines
- Working knowledge of Image Upscaling as a problem class with multiple sub-problems, not one button
- A clear answer to: what is your input, and what artifacts can you tolerate?
This guide teaches you: How to pick the upscaler whose spec matches your input — and how to architect a tiled ComfyUI pipeline when no single tool handles the job.
The $40 Magnific Run That Couldn’t Save the Job
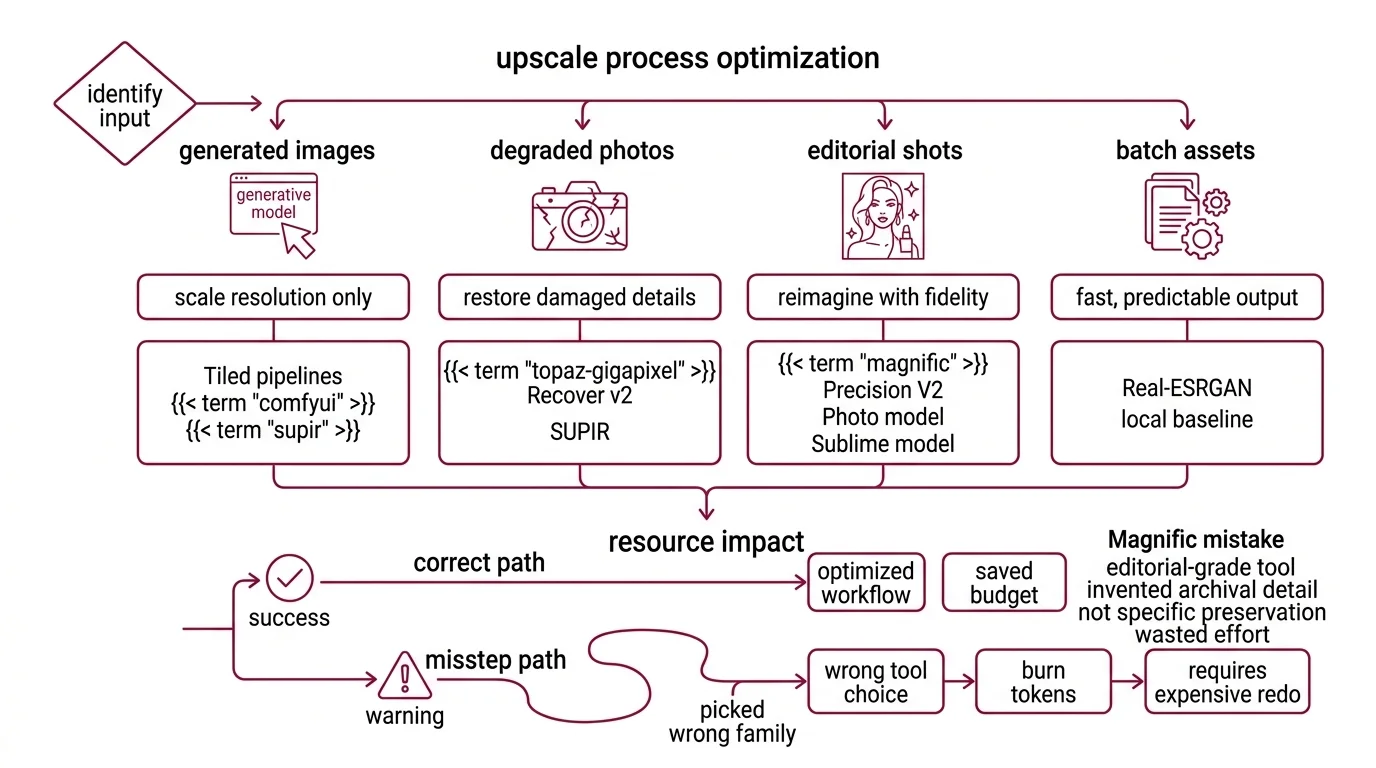
A team takes a low-res product hero, drops it into Magnific, and burns through tokens on the editorial-grade tool. The output is beautiful and wrong. Magnific Precision V2’s Sublime model is tuned to invent archival-quality detail, not preserve a specific fabric weave. Wrong family. Wrong job. Per third-party reviews, a 2x upscale of a 1450×850 image runs about 5 tokens, and a 4x to ~6000×3500 runs about 20 (Magnific pricing review) — so picking the wrong family burns budget twice: once on tokens, once on the redo.
It worked on Tuesday for a stylized lifestyle shot. On Friday, the product hero broke because the input class changed and the spec didn’t.
Step 1: Identify the Input Class
Different inputs need different priors. The mistake is picking a tool first, then forcing every input through it. Most upscaling failures I see trace back to this single skip.
Your image falls into one of four classes. Once you classify, the tool family falls out:
- Generated images (SD/SDXL/Flux output) — already coherent. You’re scaling resolution, not recovering detail. Tiled pipelines built on ComfyUI and Supir shine here.
- Old or degraded photos — compression artifacts, low resolution, scratches, color shift. Topaz Gigapixel Recover v2 and SUPIR are built for this.
- Editorial portraits or product shots where invention is welcome — preservation matters less than reimagined fidelity. Magnific Precision V2’s Photo and Sublime models target this.
- Batch assets, screenshots, line art — you want speed, low cost, predictable output. Real-ESRGAN — the production fork of the ESRGAN family — is the local baseline.
This is also where AI Image Editing tooling diverges from upscaling. Editing changes content. Upscaling changes resolution. Mixing them silently is how you end up with extra fingers in a press photo.
The Architect’s Rule: Your tool is a function of your input. Pick the input class first. The tool falls out.
Step 2: Lock Down the Constraint Spec
The model doesn’t know what you’ll tolerate. It will guess. And it will guess confidently, quickly, and sometimes catastrophically.
A complete upscaling spec answers every line of this checklist before a single inference runs.
Context checklist:
- Input dimensions, format, and color depth — 16-bit and alpha channel matter for some pipelines
- Output target dimensions and aspect ratio — including the print or display use case
- Hardware ceiling — VRAM, RAM, time-per-image budget, vendor (Intel / AMD / NVIDIA / Apple)
- Artifact budget — what’s intolerable (warped logos, plastic skin, repeated tile seams) and what’s acceptable (mild softening on background plates)
- Fidelity mode — preserve original detail, or invent plausible detail? Magnific Sublime invents. Real-ESRGAN does not.
- Tiled Upscaling required? Anything past 4K on consumer hardware almost certainly yes.
The Spec Test: If your spec says “make it sharp” without naming the artifact you can’t tolerate, the model will invent the wrong kind of sharpness. Sharpening halos, plastic skin, hallucinated logos — each one is a different failure mode that traces back to a different missing line in your context.
Step 3: Choose the Pipeline
Order matters. Build local first, escalate to hosted only when local can’t deliver. The point is not to use the most advanced tool — it’s to use the cheapest tool whose spec matches the job.
Build order for a production team in 2026:
- Real-ESRGAN with the ncnn-vulkan fork — start here. The Real-ESRGAN-ncnn-vulkan fork shipped v0.2.0 in April 2026 with portable executables for Windows, macOS, and Linux on Intel, AMD, and NVIDIA hardware (Real-ESRGAN-ncnn-vulkan releases). No Python, no environment setup. This handles the bulk of batch upscaling — assets, line art, screenshots, basic photo enlargement. Community reports place the practical floor around 4 GB VRAM with tile mode enabled, though the upstream repo doesn’t publish an official minimum.
- ComfyUI v0.19.3 with Ultimate SD Upscale — when you need control over tile size, denoise strength, and the Diffusion Models behind the upscale. The Ultimate SD Upscale node is a port of Coyote-A’s Automatic1111 script, installable through ComfyUI Manager (Ultimate SD Upscale GitHub).
- ComfyUI-SUPIR (kijai fork) — the heavy artillery for severely degraded inputs. Diffusion-based restoration, higher VRAM, but state-of-the-art for old photos and heavily compressed sources. The kijai fork is the actively maintained 2026 version, with pruned safetensors on Hugging Face and lower VRAM than the original SUPIR (ComfyUI-SUPIR GitHub).
- Magnific Precision V2 — when output is editorial and you’re billing the client. Three specialized models: Sublime for archival and product work, Photo for portraits and editorial, Photo Denoiser for low-light or compressed sources. Hosted exclusively on Freepik. Pro plan starts at $39/month for ~2,500 tokens (Magnific pricing review).
- Topaz Gigapixel 8.4.x — desktop pipeline for photographers and post-production teams who don’t want a ComfyUI graph in their week. Redefine and Recover v2 are the headline generative models — Recover v2 was rebuilt for old photos, cityscapes, and line art and runs about 5x faster than the previous Recover model (Topaz Gigapixel 8.3 release notes). Generative models other than Standard Max require at least 8 GB VRAM.
For each component in your routing rule, the context must specify input shape and color space, output shape and quality target, VRAM ceiling for the run, and the acceptable graceful-failure mode if the primary path can’t deliver.
Step 4: Validate the Output
“It looks better” is not validation. It’s a vibe. You need a checklist that names specific artifacts and the symptoms that diagnose each.
Validation checklist for any upscale:
- Edge integrity — failure looks like: white halos around high-contrast edges, oversharpening crunch on text edges
- Texture realism — failure looks like: smoothed plastic-skin face, painted-over fabric, suspiciously symmetric pores
- Text and logos — failure looks like: warped letterforms, hallucinated characters, melted brand marks
- Structural fidelity — failure looks like: extra fingers, mismatched window frames, doubled background elements
- Tile boundaries — failure looks like: visible seams every N pixels where N matches your tile size
For tiled pipelines specifically, run a seam-detection pass at 100% zoom across the full canvas — horizontally and vertically. Seams hide in skies and walls, the low-frequency areas where the eye stops looking.
Security & compatibility notes:
- Topaz Gigapixel licensing: Perpetual licenses end October 3, 2026 (Topaz pricing page). Only subscription plans remain after that. New AI models will land in Topaz Studio rather than standalone Gigapixel — factor this into any multi-year procurement.
- Magnific V1 vs V2: Tutorials referencing the original single-slider Magnific are outdated. The current Freepik-hosted product is Magnific Precision V2 with three specialized models (Sublime, Photo, Photo Denoiser).
- ComfyUI version pin: Update to v0.19.3 (April 17, 2026) before running tiled workflows on quantized SDXL or Flux models — older 2026 builds had an OOM regression that crashes mid-upscale (ComfyUI changelog).
- Real-ESRGAN main repo cadence: Slow commit activity in 2025–2026, but not deprecated. New features ship first in the ncnn-vulkan fork and downstream ComfyUI wrappers. Track those if you need recent bugfixes.
Common Pitfalls
| What You Did | Why AI Failed | The Fix |
|---|---|---|
| One-shot “make it bigger” | Model picked the closest prior to your input, not the one you needed | Classify input class before choosing tool |
| No tile size specified | Default tile blew past VRAM, OOM crash mid-run | Set tile size to fit comfortably under your VRAM ceiling for the chosen base model |
| Used Magnific for preservation work | Sublime and Photo are tuned to invent editorial detail, not preserve original fabric and logos | Use Real-ESRGAN or Topaz Recover v2 for fidelity-first jobs |
| Skipped seam validation | Tile boundaries hide in skies and walls — invisible at thumbnail zoom | Run seam-detection pass at full zoom across the whole canvas |
| Forgot to update ComfyUI before a quantized run | Older 2026 builds OOM on quantized SDXL or Flux | Pin to v0.19.3+ in your environment manifest |
Pro Tip
Architect your upscaling pipeline as a fallback chain, not a single tool. Real-ESRGAN handles the 70% case for cents. Tiled ComfyUI handles the next 25% that needs custom control. Magnific or Topaz handle the 5% that’s billable. Spec the routing rule once and reuse it on every project. Advanced ComfyUI graphs sometimes pair upscalers with LoRA for Image Generation to bias the diffusion pass toward a specific style or product domain — useful, but it adds another spec line to maintain. Add it only when the artifact budget demands it.
Frequently Asked Questions
Q: How to upscale photos with Real-ESRGAN locally on a consumer GPU? A: Use the Real-ESRGAN-ncnn-vulkan fork (v0.2.0, April 2026) — portable executables run on Windows, macOS, and Linux across Intel, AMD, and NVIDIA hardware. Enable tile mode if your image is larger than your VRAM comfortably handles. The realesrgan-x4plus-anime model is for animation only, not photographs.
Q: When should you use Magnific V2 versus Topaz Gigapixel 8 for portrait upscaling? A: Magnific Precision V2’s Photo model excels when you want editorial reinvention — skin, hair, and fabric reimagined. Topaz Gigapixel 8.4’s Face Recovery Gen2 wins when you must preserve identity and original micro-detail. No public 2026 benchmark settles this; pick by job type, not by claim.
Q: How to set up tiled upscaling in ComfyUI for images larger than VRAM allows? A: Install Ultimate SD Upscale via ComfyUI Manager. Pick a tile size that fits your base model and VRAM headroom — SDXL needs more than SD1.5, ControlNet adds cost. Enable mask blur for seam blending. Update ComfyUI to v0.19.3 first; older 2026 builds crash on quantized SDXL/Flux upscales.
Q: How to integrate an upscaler into a Stable Diffusion post-processing pipeline step by step in 2026? A: Generate at native SD or SDXL resolution. Pipe the output into a tiled upscaler node — Ultimate SD Upscale for general work, ComfyUI-SUPIR for restoration. Cap denoise strength low to preserve the original composition. Run a seam-detection validation pass at full zoom before saving the final file.
Your Spec Artifact
By the end of this guide, you should have:
- An input-classification map — generated, degraded, editorial, or batch — tied to a specific tool family
- A constraint checklist covering hardware ceiling, artifact budget, fidelity mode, and tiling thresholds
- A validation list with five named failure modes and the symptoms that diagnose each one
Your Implementation Prompt
Use this prompt with Claude Code, Cursor, or your preferred AI assistant when scaffolding an upscaling pipeline. Replace each bracketed placeholder with the values from your Step 2 checklist before sending it to the model. Every bracket maps to a specific line of the constraint spec — no generic placeholders.
I need to architect an image upscaling pipeline.

INPUT CLASS: [generated / degraded photo / editorial portrait / batch asset]
INPUT SHAPE: [width x height], [format], [color depth], [alpha y/n]
OUTPUT TARGET: [width x height], [aspect ratio], [output format], [print or display]
HARDWARE CEILING: [VRAM in GB], [RAM in GB], [GPU vendor], [time per image budget]
ARTIFACT BUDGET:
  intolerable: [list, e.g., "warped logos", "plastic skin", "tile seams in skies"]
  acceptable: [list, e.g., "minor softening on out-of-focus background"]
FIDELITY MODE: [preserve original detail / invent plausible detail]
TILING REQUIRED: [yes if output > 4K on consumer GPU, otherwise no]

PIPELINE COMPONENTS (route through in this order):
1. Local baseline: Real-ESRGAN-ncnn-vulkan for [batch case description]
2. Tiled diffusion: ComfyUI Ultimate SD Upscale (ComfyUI v0.19.3+) for [custom-control case]
3. Restoration: ComfyUI-SUPIR (kijai fork) for [degraded input case]
4. Hosted editorial: Magnific Precision V2 [Sublime / Photo / Photo Denoiser] for [billable case]
5. Desktop fallback: Topaz Gigapixel 8.4.x [Redefine / Recover v2 / Face Recovery Gen2] for [photographer workflow]

For each component, generate the routing rule that decides whether to use it
based on INPUT CLASS, FIDELITY MODE, and HARDWARE CEILING.

VALIDATION STEP: Output must pass these five checks before saving:
- Edge integrity (no oversharpening halos)
- Texture realism (no plastic-skin smoothing)
- Text and logo fidelity (no melted letterforms)
- Structural fidelity (no extra fingers or doubled elements)
- Tile boundary seams (no visible seams in low-frequency areas)

Output: a routing function that maps INPUT CLASS + constraints to the correct
pipeline component, plus a validation harness that fails fast on any of the
five named artifact classes.
Ship It
You now know that upscaling isn’t one problem — it’s four. You can name the input class, pick the family that fits, set tile and VRAM constraints before a single inference runs, and validate against five specific artifacts instead of “looks better.” That’s a spec. The next two hundred jobs use the same spec.
AI-assisted content, human-reviewed. Images AI-generated. Editorial Standards · Our Editors