How to Design and Run Rigorous Ablation Experiments with ABLATOR, W&B Sweeps, and PyTorch in 2026

Table of Contents
TL;DR
- Every component in your model must justify its cost — ablation is how you make it prove that
- Specify your baseline, removal strategy, and success metric before touching any code
- Three tools handle three concerns: PyTorch for the model, ABLATOR for systematic removal, W&B Sweeps for tracking what changed
You added a residual connection last Tuesday. Validation loss dropped. You shipped it. But here is the question you skipped: did that connection actually cause the improvement, or did the learning rate scheduler you tweaked the same afternoon deserve the credit? Without a controlled Ablation Study, you are guessing. This guide gives you a specification framework to stop guessing.
Before You Start
You’ll need:
- PyTorch 2.11.0 environment (pip install — Conda is no longer supported for PyTorch, per PyTorch Releases)
- ABLATOR installed via
pip install ablator(Linux/macOS native; Windows requires WSL) - A Weights & Biases account (free tier works for personal experiments)
- A trained Baseline Model with a known performance metric
This guide teaches you: how to decompose your model into testable components, specify what “removal” means for each one, and validate that your results are not noise.
The Architecture Claim Nobody Proved
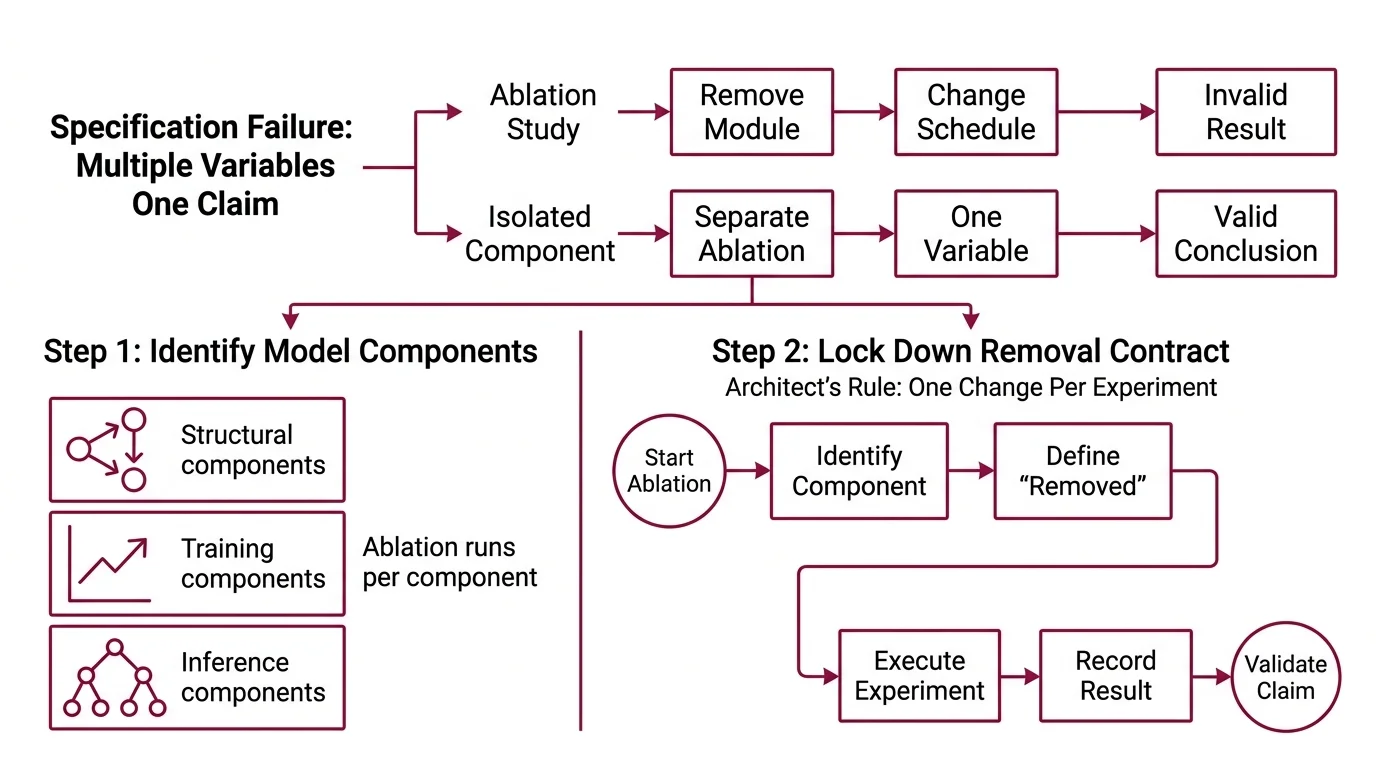
You have read the paper. “Our attention module improves F1 by 3.2 points.” Clean result. Confident conclusion. But when you dig into the appendix, the ablation study removed the module and changed the training schedule at the same time. Two variables. One claim.
This happens constantly. A team reports a win, ships the component, and three months later someone discovers that the dropout layer they added alongside it was doing all the work. The architecture got credit. The Regularization earned it.
That confusion is a specification failure. The experiment never isolated the variable.
Step 1: Identify What Your Model Is Made Of
Before you remove anything, you need a complete parts list. Not a vague architecture diagram — a specification of every component that could independently affect performance.
Your model has these layers of concern:
- Structural components — attention heads, skip connections, normalization layers. These change how information flows. Each one is a removal candidate.
- Training components — learning rate schedule, dropout rate, data augmentation strategy. These change how the model learns. Removing one changes the optimization trajectory.
- Inference components — beam search width, temperature, post-processing rules. These change what the model outputs. Often overlooked in ablation but they carry real weight.
The Architect’s Rule: If two components were added in the same commit, they need separate ablation runs. One change per experiment. No exceptions.
Map every component to exactly one category. If a component spans two — say, a residual connection that also acts as a regularizer — test it under both. This map is your experiment blueprint.
Step 2: Lock Down the Removal Contract
Each ablation needs a precise definition of “removed.” This is where most experiments quietly break.
Context checklist for every removal:
- What does “removing” this component mean? (Delete the layer? Zero the weights? Replace with identity? Each gives different results.)
- What stays constant? (Random seed, data split, training epochs, hardware — all of it, specified.)
- What is the success metric? ( Precision, Recall, and F1 Score, accuracy, loss — pick one primary metric and specify it before you run anything.)
- What is the significance threshold? (Define what counts as a meaningful difference. A 0.1% shift on a noisy metric is not a finding.)
- How many seeds? (One run proves nothing. Three is a minimum. Five is better for claiming Statistical Significance.)
The Spec Test: If your removal definition is “turn off the attention module,” you have not specified enough. Does “off” mean deleting the layer and reconnecting the skip path? Or zeroing the attention weights while keeping the feedforward intact? The answer changes your result — and ABLATOR needs the exact definition to automate it.
ABLATOR uses random search for ablation and TPE (Tree-structured Parzen Estimators) for Hyperparameter Tuning (ABLATOR Docs). This distinction matters. Ablation removes components to measure their contribution. Hyperparameter tuning optimizes values to improve performance. Do not mix the two in one sweep. Run your ablation first. Tune afterward — only on the components that survived.
Step 3: Wire the Experiment Pipeline
Three tools. Three jobs. No overlap.
Build order:
- PyTorch model — your baseline, frozen. PyTorch 2.11.0 gives you FlashAttention-4 and CUDA 13.0 as the default backend (PyTorch Releases). Define your model so each ablation target is a toggleable module. Flag it, do not hardcode it.
- ABLATOR configuration — defines which components get removed and in what combinations. ABLATOR handles horizontal scaling across runs, so you specify the search space and it manages parallel execution (AutoML 2023 Proceedings). Keep in mind: ABLATOR is a specialized research tool with modest community adoption, so expect to rely on documentation rather than Stack Overflow threads.
- W&B Sweeps — tracks every run, logs metrics, and visualizes which removals caused which shifts. Sweeps support Bayesian, grid, and random search strategies (W&B Docs). For ablation, random search over your binary toggles is usually sufficient.
For each ablation run, your configuration must specify:
- Which component is removed (input)
- What metric is recorded (output)
- What the baseline comparison value is (constraint)
- What happens if the run crashes mid-training (error handling — ABLATOR restarts failed trials automatically)
Step 4: Validate That Your Results Mean Something
Running the experiments is the easy part. Knowing whether the results are real — that is the specification challenge.
Validation checklist:
- Seed variance check — run each configuration across at least three seeds. If the standard deviation across seeds is larger than the difference between “with component” and “without,” your finding is noise. Failure looks like: “F1 dropped 0.8 points when we removed the layer” but seed variance is 1.2 points.
- Metric consistency — check your primary metric against at least one secondary metric. If F1 improves but your Confusion Matrix shows a class collapsed to zero predictions, the improvement is an artifact.
- Interaction effects — remove components in pairs, not just individually. Component A might only matter when Component B is present. ABLATOR’s search space handles combinatorial configurations, but you need to specify which pairs to test.
- Benchmark Contamination check — verify your test set was not seen during any training run. Contamination voids every result downstream.
Common Pitfalls
| What You Did | Why the Experiment Failed | The Fix |
|---|---|---|
| Removed two components at once | Cannot attribute the metric change to either one | One removal per run — test pairs separately |
| Used a single random seed | Results are within noise range | Minimum three seeds per configuration |
| Defined “removal” as “commented out the code” | Changed the computational graph in unpredictable ways | Specify replacement (identity layer, zero mask, skip connection) |
| Compared against a stale baseline | Baseline was trained with different data or hyperparameters | Retrain baseline with identical settings, same commit |
| Skipped tracking experiment metadata | Cannot reproduce the result six weeks later | W&B logs everything — config, hardware, git hash. Use it. |
Pro Tip
Reproducibility is not a virtue — it is a specification. If your ablation cannot be rerun from a config file and a git commit, it is not an experiment. It is an anecdote. Serialize every variable: seed, data path, hardware, library versions. ABLATOR configs and W&B run metadata together give you a complete audit trail. Future you will thank present you when the reviewer asks “can you reproduce Table 3?”
Frequently Asked Questions
Q: When should you run ablation studies during model development? A: Run ablation after your baseline stabilizes but before you finalize architecture for production. Too early and your baseline is noisy — removals tell you nothing. Too late and sunk-cost bias protects components that should be cut. The sweet spot: once your Model Evaluation metrics plateau across three consecutive training runs. Some teams run lightweight ablation checks at every major architecture change as a gating criterion for merge requests.
Q: How to use ablation studies to justify architecture decisions in ML papers? A: Report every component removal in a table — the baseline metric, the metric after removal, the delta, and the seed-averaged standard deviation. Reviewers look for two things: isolated variables and statistical rigor. A common miss is reporting only the “best seed” result instead of the mean across seeds. Include the variance. If a component’s contribution falls within the noise floor, be honest about it — reviewers respect that more than inflated claims.
Q: How to set up and run an ablation study step by step in PyTorch in 2026?
A: Define your baseline model with toggleable modules (boolean flags per component). Create an ABLATOR config specifying the search space of those toggles. Run pip install ablator and configure the parallel execution backend. Track all runs in W&B with wandb sweep and wandb agent. Analyze results by comparing each ablation config against the baseline across multiple seeds. The implementation prompt below encodes this entire workflow into a reusable spec.
Security & compatibility notes:
- TorchScript deprecated: PyTorch 2.11.0 deprecates TorchScript. Migrate model serialization to
torch.export. If your ablation pipeline usestorch.jit.scriptfor model snapshots, replace it before running experiments.- Conda channel removed: PyTorch no longer publishes to Conda. Install via pip only.
- CUDA 13.0 default, Volta dropped: PyTorch 2.11.0 defaults to CUDA 13.0. Volta GPU support is removed from CUDA 12.8+ builds. If your cluster runs Volta GPUs (V100), pin to an older CUDA build or upgrade hardware.
Your Spec Artifact
By the end of this guide, you should have:
- Component map — every module in your model categorized as structural, training, or inference, with a defined removal method for each
- Removal contract — the exact definition of “removed” for every component, plus seed count, significance threshold, and primary metric
- Validation criteria — seed variance bounds, secondary metric cross-checks, and interaction pairs to test
Your Implementation Prompt
Copy this into Claude Code, Cursor, or your AI coding tool of choice. Fill the bracketed placeholders with your specific values from the component map and removal contract above.
You are setting up an ablation experiment pipeline. Here is the specification:

MODEL COMPONENTS (from my component map):
- Structural: [list each structural component, e.g., "self-attention in layer 3", "skip connection block 2"]
- Training: [list each training component, e.g., "cosine LR scheduler", "dropout at 0.3"]
- Inference: [list each inference component, e.g., "beam search width 5", "temperature 0.7"]

REMOVAL DEFINITIONS (from my removal contract):
- For each structural component: [specify replacement — identity layer, zero mask, or skip reconnect]
- For each training component: [specify default replacement — e.g., "constant LR at 1e-3", "dropout at 0.0"]
- For each inference component: [specify removal — e.g., "greedy decoding", "temperature 1.0"]

EXPERIMENT PARAMETERS:
- Baseline metric: [your primary metric, e.g., "F1 macro on test split"]
- Secondary metric: [cross-check metric, e.g., "per-class recall"]
- Seeds per configuration: [minimum 3, recommended 5]
- Significance threshold: [e.g., "delta > 2x seed standard deviation"]
- Framework: PyTorch 2.11.0, ABLATOR for search orchestration, W&B for tracking

CONSTRAINTS:
- One component removed per run (no simultaneous removals except specified interaction pairs)
- Interaction pairs to test: [list pairs, e.g., "(attention, skip connection)"]
- All runs must log: config, seed, hardware, git commit hash, epoch-level metrics
- Baseline must be retrained with identical settings for fair comparison

VALIDATION:
- Flag any ablation where seed variance exceeds the measured delta
- Flag any ablation where secondary metric diverges from primary metric direction
- Generate summary table: component | baseline | ablated (mean +/- std) | delta | significant?

Generate the ABLATOR config YAML and W&B sweep YAML for this experiment.
Ship It
You now have a framework for proving — not assuming — that every component in your model earns its place. The specification is the experiment. The experiment is the evidence. Next time someone asks “why did you keep that attention head?” you will have a table, not a hunch.
AI-assisted content, human-reviewed. Images AI-generated. Editorial Standards · Our Editors