How to Build a GAN with PyTorch and Apply It to Super-Resolution and Synthetic Data in 2026
Table of Contents
TL;DR
- A GAN has four specification surfaces — generator, discriminator, training loop, and data pipeline — each needs its own contract
- Super-resolution (Real-ESRGAN) and synthetic data (CTGAN) are the two domains where GANs still outperform diffusion models in production
- Specify loss functions, image dimensions, and learning rate schedules before your AI tool writes a single line — or debug mode collapse for a week
You asked Claude Code to build a Generative Adversarial Network. It generated a generator, a discriminator, and a training loop. Twenty epochs in, every output was the same blurry face. The architecture was fine. The loss functions were fine. The learning rate was wrong by a factor of ten — and your spec never mentioned it.
Before You Start
You’ll need:
- An AI coding tool — Claude Code, Cursor, or Codex
- Working knowledge of PyTorch tensor operations and autograd
- Understanding of Neural Network Basics for LLMs — forward pass, backpropagation, loss computation
- Familiarity with Convolutional Neural Network layer types (Conv2d, ConvTranspose2d, BatchNorm)
- A clear picture of what your GAN should produce — faces, upscaled images, or synthetic tabular rows
This guide teaches you: how to decompose a GAN project into four specification surfaces so your AI tool generates training-stable code on the first pass.
The Mode Collapse You Could Have Prevented
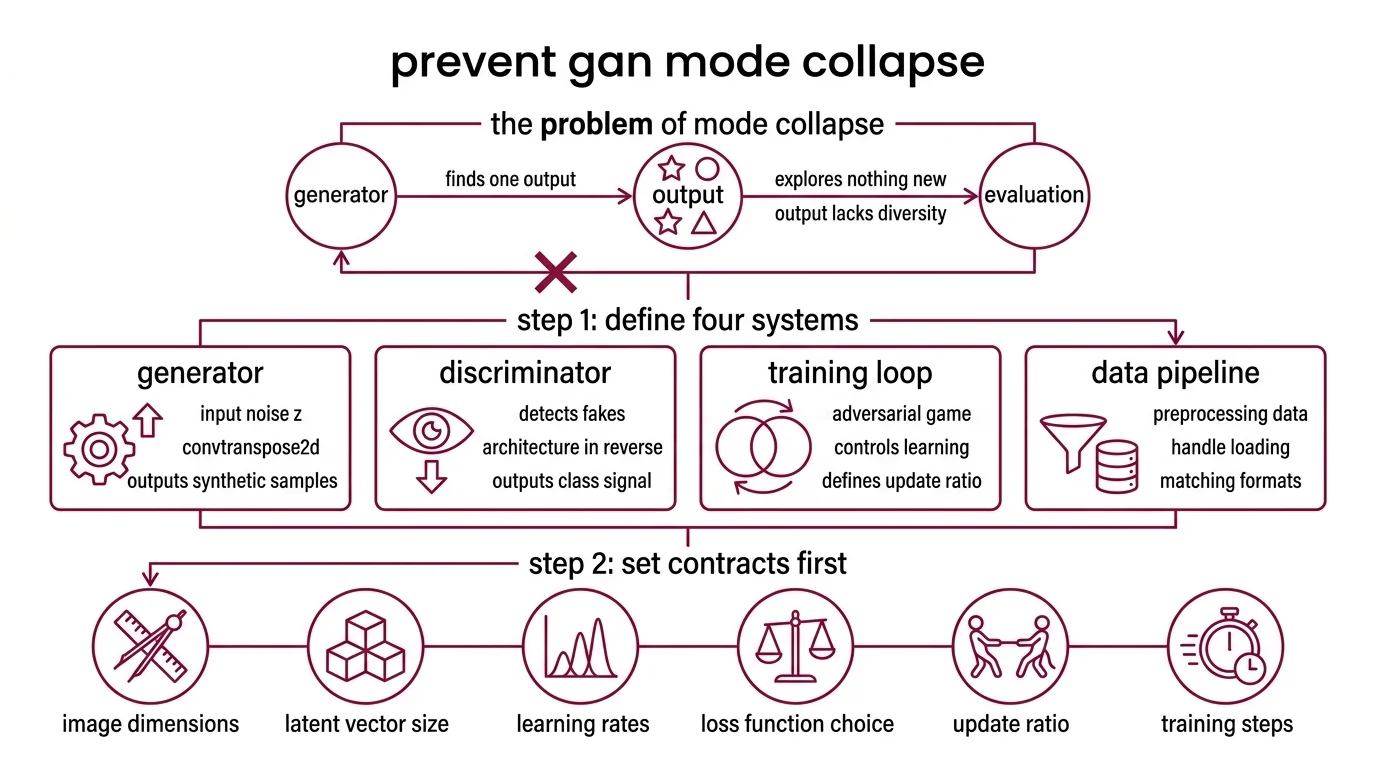
Mode collapse is the GAN failure everyone hits and nobody specs against. Your generator finds one output that fools the discriminator — and stops exploring. Every image looks the same. Every synthetic row clusters around the same values.
The root cause is almost never the architecture. It is the training loop. Learning rates, loss function choice, update ratio between generator and discriminator — skip any one constraint and stability vanishes.
It worked on Tuesday. On Thursday, you added a new data augmentation step, the discriminator got too strong, and the generator collapsed to producing gray squares.
Step 1: Separate the Four Specification Surfaces
A GAN is not one model. It is four systems pretending to be one.
Your system has these parts:
- Generator — takes a noise vector (latent z), outputs a synthetic sample. Architecture depends on your output domain: ConvTranspose2d layers for images, dense layers for tabular data.
- Discriminator — takes a real or fake sample, outputs a classification signal. Mirror of the generator architecture but in reverse. Its job is to get better at detecting fakes — but not too fast.
- Training loop — orchestrates the adversarial game. Controls who learns when, how much, and from what. This is where most GAN projects fail.
- Data pipeline — handles loading, preprocessing, normalization, and augmentation. The generator must output data in the exact format the discriminator sees real data. Mismatch here equals silent failure.
The Architect’s Rule: If your specification doesn’t describe all four surfaces, your AI tool will make assumptions about the ones you skipped. Those assumptions will be wrong.
Step 2: Lock Down Every Contract Before Generation
What your AI coding tool needs to know before it writes anything:
Context checklist:
- Image dimensions and channel count (64x64 RGB = 3 channels, not 1)
- Latent vector size (z_dim) — 100 is conventional for DCGAN, but your spec must say so
- Loss function: BCE, WGAN-GP, or hinge loss — each changes the training dynamics entirely
- Optimizer and learning rate for BOTH networks separately (Adam with lr=0.0002, beta1=0.5 is the DCGAN default — both values matter)
- Update ratio: how many discriminator steps per generator step
- Normalization: BatchNorm in generator, avoid BatchNorm in discriminator for WGAN variants
- Weight initialization scheme (normal, mean=0, std=0.02 for DCGAN)
- Device handling: CUDA, MPS, or CPU fallback
The Spec Test: If your context says “use Adam” without specifying beta1, the AI will use the PyTorch default (0.9). DCGAN stability requires 0.5. That single missing parameter causes mode collapse.
Step 3: Build the Pipeline in Dependency Order
Not everything can be built at once. The build order matters because each component validates against the previous one.
Build order:
- Data pipeline first — because it defines the tensor shape everything else must match. Normalization range ([-1, 1] or [0, 1]) propagates to the generator’s final activation (tanh vs. sigmoid).
- Discriminator second — because it is the simpler network and establishes the input contract. If the discriminator accepts 64x64x3 tensors, the generator must produce exactly that.
- Generator third — because its output shape must match the discriminator’s input. Specify ConvTranspose2d layer math so spatial dimensions land on 64x64 exactly, not 63x63.
- Training loop last — because it wires everything together. Your spec must include: loss computation for both networks, gradient zeroing order, and checkpointing frequency.
For each component, your context must specify:
- What it receives (data loader batches, noise vectors, loss values)
- What it returns (fake images, probability scores, loss scalars)
- What it must NOT do (generator must not see real images, discriminator must not update during generator training)
- How to handle failure (NaN loss = stop training, save checkpoint, log the epoch)
Step 4: Prove the GAN Actually Learned
Training loss going down means nothing in a GAN. Both losses oscillate — that is expected. You need different signals.
Validation checklist:
- Visual inspection at intervals — save generated samples every N epochs. Failure looks like: identical outputs (mode collapse), static noise (generator not learning), or checkerboard artifacts (ConvTranspose2d stride issues)
- Discriminator confidence — if D(fake) stays near 0.0, the generator is losing. If D(fake) stays near 1.0, the discriminator collapsed. Healthy range: D(fake) oscillates around 0.3-0.7
- Loss divergence — generator loss climbing while discriminator loss approaches zero means the discriminator won. Check your learning rate ratio
- FID score (for image GANs) — Frechet Inception Distance against your real dataset. Lower is better. If it climbs after early epochs, you are overfitting or collapsing
Super-Resolution with Real-ESRGAN: Spec the Inference, Not the Training
Real-ESRGAN is a pretrained GAN pipeline for image upscaling — 2x, 4x, up to 10x (Real-ESRGAN GitHub). You are not training from scratch here. You are specifying which model to load and how to integrate it.
The spec surface shrinks to two concerns: model selection and preprocessing contract.
Model selection: RealESRGAN_x4plus handles general photos. The anime variant (x4plus_anime_6B) handles cel-shaded art. The realesr-general-x4v3 is smaller and faster for batch processing. Your spec must name the model — or your AI tool picks the first one it finds.
Preprocessing contract: Input images must be loaded as BGR numpy arrays (OpenCV convention, not PIL’s RGB). Normalization happens inside the inference pipeline. Specify output format: numpy array, PIL image, or saved to disk.
As of 2026, Real-ESRGAN v0.3.0 remains the standard open-source super-resolution option, though the release dates to September 2024 (Real-ESRGAN GitHub). Diffusion-based upscalers exist, but Real-ESRGAN’s inference speed makes it the practical choice for batch pipelines.
GANs for sequence-based tasks like audio or text use Recurrent Neural Network layers instead of convolutions, but the four-surface decomposition applies regardless of the layer type.
Compatibility & freshness notes:
- Real-ESRGAN / basicsr: torchvision 0.17+ removed
functional_tensor, breaking thebasicsrdependency. A runtime monkey-patch workaround exists (Real-ESRGAN GitHub, issue #859). Pin torchvision or apply the patch before deployment.- PyTorch torch.load: Default changed to
weights_only=Truein recent versions. Loading older Real-ESRGAN checkpoints may requireweights_only=Falseexplicitly (PyTorch Blog).- Stylegan: Research code drop from 2021 — custom CUDA plugins may not compile on PyTorch 2.11 or newer CUDA toolkits (StyleGAN3 GitHub). Test in your target environment before committing.
- TorchScript: Deprecated in PyTorch 2.6+. Use
torch.exportfor model serialization (PyTorch Blog).
Synthetic Data with CTGAN: Spec the Data Contract
GANs for tabular synthetic data follow the same four-surface decomposition, but the architecture swaps convolutions for dense layers with mode-specific normalization.
SDV (Synthetic Data Vault) v1.35.1 bundles CTGAN as a ready-to-use synthesizer (SDV Docs). Your specification surfaces:
- Data contract: column types (categorical vs. continuous), primary keys to preserve, constraints (age > 0, end_date > start_date)
- Privacy constraints: differential privacy epsilon if required, which columns are sensitive
- Quality metric: statistical similarity between real and synthetic distributions — SDV provides evaluation tools
- Output format: DataFrame schema matching the original, row count, null handling
The underlying GAN architecture is handled by the library. Your spec owns the data contract, not the neural network.
Common Pitfalls
| What You Did | Why AI Failed | The Fix |
|---|---|---|
| “Build me a GAN” (one-shot) | AI merged all four surfaces with hardcoded defaults | Decompose into generator, discriminator, loop, data pipeline |
| No learning rate specified | AI used PyTorch default (1e-3), too high for GANs | Specify lr=0.0002 with beta1=0.5 for both optimizers |
| Same lr for both networks | Generator and discriminator need different update dynamics | Specify per-network learning rates and update ratio |
| No output dimension math | ConvTranspose2d produced 63x63 instead of 64x64 | Include kernel, stride, padding values in the spec |
Pro Tip
Every GAN project has a training loop, and every training loop has a hidden contract: who updates when, and how much. Spec the update ratio first. Everything else follows. This principle applies to any multi-agent system where components compete — the orchestration logic is always the hardest surface to specify and the easiest to skip.
Frequently Asked Questions
Q: How to build a generative adversarial network from scratch in PyTorch step by step? A: Decompose into four surfaces: data pipeline (defines tensor shape), discriminator (establishes input contract), generator (matches discriminator input), training loop (orchestrates updates). Spec each surface’s contract before generating code. PyTorch 2.11.0 includes a DCGAN tutorial (PyTorch Tutorials) that follows this decomposition — use it as reference architecture, not copy-paste code.
Q: How to use Real-ESRGAN for image upscaling in 2026? A: Pick the right model for your domain: RealESRGAN_x4plus for photos, x4plus_anime_6B for animation, realesr-general-x4v3 for speed. Spec the input format (BGR numpy via OpenCV, not PIL RGB) and output destination. Watch for the basicsr/torchvision compatibility break on PyTorch 2.11 — the monkey-patch fix takes one line but you need to know it exists before deployment.
Q: How to use GANs for synthetic data augmentation in machine learning? A: Use SDV’s CTGAN synthesizer instead of building from scratch — it handles the GAN internals. Your spec focuses on the data contract: column types, constraints (age > 0, dates in order), privacy budget, and output schema. Evaluate synthetic quality against real distributions before feeding augmented data into downstream models. Column-level statistical tests catch drift that row-level inspection misses.
Your Spec Artifact
By the end of this guide, you should have:
- A four-surface decomposition map — generator, discriminator, training loop, data pipeline, each with defined inputs, outputs, and constraints
- A constraint checklist — learning rates, loss functions, normalization ranges, update ratios, and device handling for your specific GAN variant
- A validation protocol — visual inspection schedule, discriminator confidence ranges, FID baselines, and NaN-loss escape hatches
Your Implementation Prompt
Use this prompt in Claude Code, Cursor, or Codex when starting a new GAN project. Fill in the bracketed placeholders with values from your constraint checklist.
Build a GAN training pipeline in PyTorch with these specifications:

DATA PIPELINE:
- Dataset: [your dataset path or torchvision dataset name]
- Image dimensions: [width]x[height]x[channels]
- Normalization range: [e.g., -1 to 1]
- Batch size: [e.g., 128]
- Data augmentation: [list transforms or "none"]

GENERATOR:
- Input: noise vector z of dimension [z_dim, e.g., 100]
- Architecture: [ConvTranspose2d / Dense] layers
- Final activation: [tanh for [-1,1] / sigmoid for [0,1]]
- Weight init: normal, mean=0, std=[e.g., 0.02]
- Normalization: [BatchNorm after each layer except output / none]

DISCRIMINATOR:
- Input: [width]x[height]x[channels] tensor
- Architecture: [Conv2d / Dense] layers, mirror of generator
- Final activation: [sigmoid for BCE / none for WGAN]
- Weight init: same scheme as generator
- Normalization: [BatchNorm / LayerNorm / none]

TRAINING LOOP:
- Loss function: [BCE / WGAN-GP / Hinge]
- Generator optimizer: Adam(lr=[e.g., 0.0002], betas=([e.g., 0.5], 0.999))
- Discriminator optimizer: Adam(lr=[e.g., 0.0002], betas=([e.g., 0.5], 0.999))
- Update ratio: [e.g., 1 D step per 1 G step]
- Total epochs: [e.g., 200]
- Checkpoint: save every [N] epochs
- Device: CUDA if available, MPS fallback, then CPU

VALIDATION:
- Save sample grid every [N] epochs
- Log G_loss and D_loss per epoch
- Stop if loss is NaN — save last valid checkpoint
- Track D(real) and D(fake) means per epoch
Ship It
You now have a decomposition framework for any GAN project — from a DCGAN on faces to Real-ESRGAN inference to CTGAN synthetic data. The four-surface model gives your AI tool the contracts it needs to generate stable training code. Spec the constraints. Let the AI write the layers.
AI-assisted content, human-reviewed. Images AI-generated. Editorial Standards · Our Editors