How to Build a Data Drift Monitoring Pipeline with Evidently, NannyML, and Alibi Detect in 2026
TL;DR
- A monitor that watches input distributions alone misses the failure that actually hurts you: the model gets familiar inputs but maps them wrong.
- Pair a drift detector with a label-free performance estimator, so you alert on decay, not on every wobble in the data.
- Broader detectors are powerful, but production tooling has license tiers. Decide who runs where before you build.
Your drift dashboard went green every morning for six weeks. Then a customer flagged that the fraud model was waving through charges it used to block. You pull the logs. The input features barely moved — same ranges, same shapes. But the link between those features and the outcome had rotted underneath you. The dashboard was watching the wrong thing, and it watched it perfectly.
Before You Start
You’ll need:
- An AI coding tool you trust for scaffolding (Claude Code, Cursor, or Codex)
- A working grasp of Data Drift and what Model Monitoring is supposed to catch
- A clear picture of one deployed model: its features, its target, and how often you actually get labels back
This guide teaches you: how to decompose a drift monitor into capture, detect, and decide layers, then specify each one so an AI tool builds the pipeline you meant instead of the one it guessed.
The Green Dashboard That Hid a Dying Model
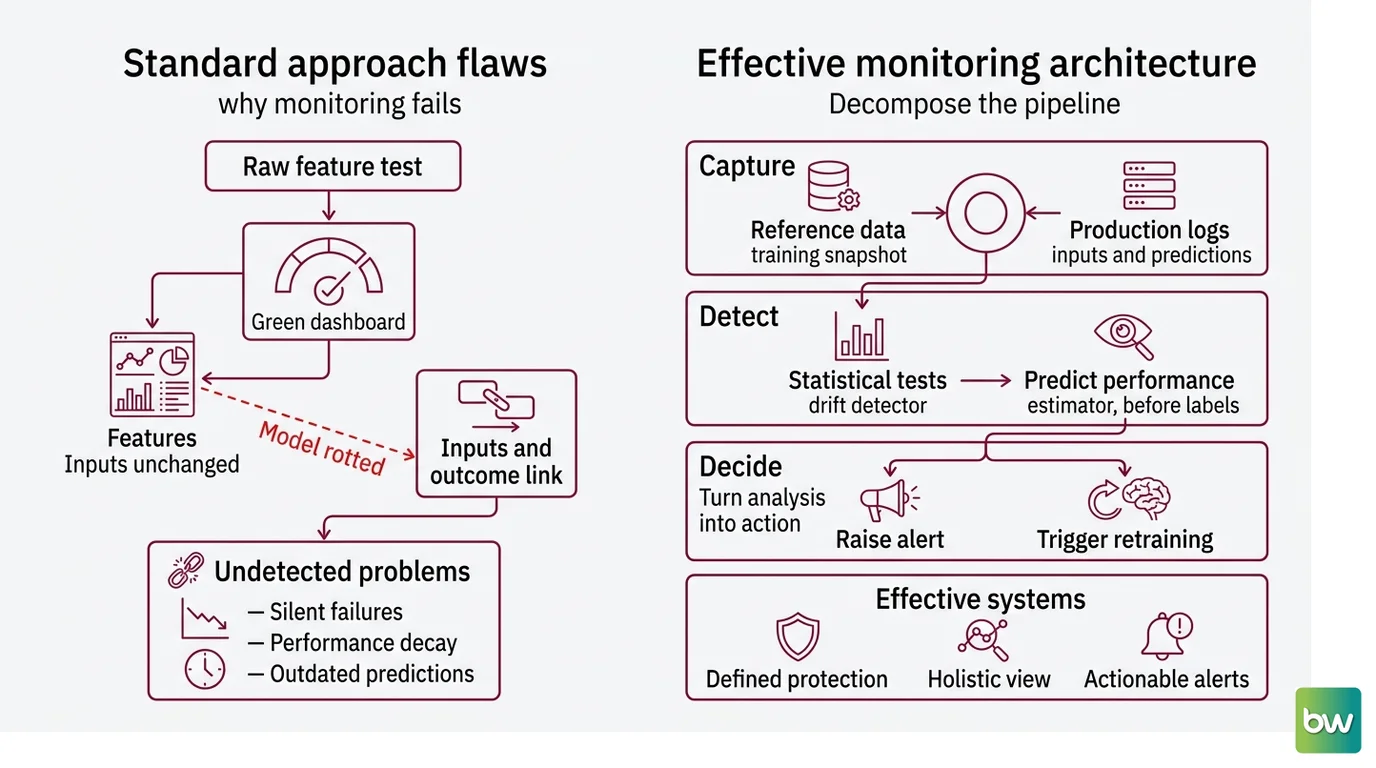
Most drift pipelines fail the same way. Someone wires up a detector, points it at the production feature stream, and ships. Every distribution test passes. Everyone moves on. The monitor is technically running and practically useless, because nobody specified what it was supposed to protect.
The fraud model above is a textbook case. The features stayed put — that is Covariate Shift staying quiet. What rotted was the link between those inputs and the outcome, the kind of change that Label Drift and concept drift describe and that a raw feature test never sees. A monitor that only measures distance between feature histograms answers a different question than the one your on-call engineer asks at 2 AM: is the model still right? Drift is not the same as decay, and that gap is where green dashboards hide dying models.
It worked on Friday. On Monday, the model was silently wrong, because the only signal anyone specified was “do the inputs look different” — and they didn’t.
Step 1: Decompose the Pipeline Into Capture, Detect, and Decide
Before you ask an AI tool to build anything, break the system into layers it can reason about one at a time. A drift monitor is three concerns stacked, not one big script.
Your system has these parts:
- Capture — a reference dataset snapshot (your training distribution or a validated production window) plus a live log of production inputs and predictions. This is the ground you compare against. No comparison exists without both sides.
- Detect — two separate jobs. A drift detector runs statistical tests on the captured data, and a performance estimator predicts how the model is doing when labels haven’t arrived yet. These are not the same measurement.
- Decide — the layer that turns a number into an action: stay quiet, raise an alert, or trigger Model Retraining. This is where most pipelines have nothing at all, which is why they alert on everything.
The Architect’s Rule: If you can’t explain the system in three layers, the AI can’t build it either.
The split matters because each layer has a different failure mode. Capture fails silently when logging drops fields. Detection fails loudly with false alarms. The decide layer fails by never existing. Name the layers now and no detection happens without data on both sides becomes a rule the AI enforces instead of an assumption it skips.
Step 2: Lock Down the Drift Contract
This is the step people skip, and it is the step that decides whether your monitor is signal or noise. The contract is everything the AI must know before it picks a single test. Leave any line blank and the tool will choose for you — confidently, and often wrong for your data.
Context checklist:
- Reference window policy. Fixed training snapshot, or a rolling window that absorbs legitimate seasonal change? State which, and why. A fixed baseline that never updates will scream every December.
- Per-feature-type test mapping. Numerical features want a continuous test like the Kolmogorov-Smirnov Test or Wasserstein Distance, which measures how far the distribution moved. Categorical features want the Population Stability Index or Jensen-Shannon divergence. One test for every column produces scores that mean nothing.
- Thresholds. A Population Stability Index above 0.2 is a common convention for “meaningful shift,” but it is a starting point, not a law. Pick your number and write it down.
- Label availability. Do labels arrive late, or never? This single fact decides whether your decay signal comes from real accuracy or from an estimator.
- Univariate vs multivariate scope. Single-feature drift and joint-distribution shift are different alarms. Decide whether you watch features one at a time, together, or both.
- Pinned tool versions. Lock them in the contract so a future install doesn’t change behavior under you.
For the detector itself, Evidently AI is the most actively developed of the three — its current release is 0.7.21, shipped March 2026 (Evidently on PyPI). It carries built-in drift detection across KS, PSI, Wasserstein, and Jensen-Shannon, and auto-selects the test by column type and data volume unless you override it, per Evidently Docs. That auto-selection cuts both ways: it usually picks sanely, but if your contract is silent, you won’t know which test produced the score you’re reading.
For the decay question, NannyML fills the gap the detector leaves. It estimates production performance without labels — CBPE for classification, DLE for regression — alongside univariate and multivariate drift, per NannyML Docs. That label-free estimate is what would have caught the fraud model: accuracy reconstructed from the model’s own confidence, not from feature histograms that looked fine.
Alibi Detect is the third option, and it has the widest detector range — online and offline, across tabular, text, image, and time-series. For a production pipeline, its license changes the decision, which is the next thing you specify.
The Spec Test: Drop the per-feature test mapping from your contract, and the detector will run its default on a categorical column. You’ll read a tidy “no drift” verdict produced by a test that was never valid for that data type.
Lock the versions and licensing in one place so the build inherits them:
Licensing & version notes:
- Alibi Detect (BSL 1.1): Version 0.13.0 (released Dec 2025, per Alibi Detect on PyPI) ships under the Business Source License, not Apache. Per Seldon’s licensing FAQ, releases after January 22, 2024 are free for development, staging, and testing only — production use requires a paid Seldon commercial license, and each version converts back to open source four years after release. If this pipeline runs in production, budget for the license or keep Alibi Detect in the experimentation tier.
- NannyML: Pin version 0.13.1 (released July 2025, per NannyML on PyPI). The open-source cadence has slowed as the company focuses on its hosted product, so a pinned version protects you from surprises.
- whylogs / WhyLabs: The open-source Whylogs logging library is still usable for profiling captured data, but the hosted WhyLabs platform was discontinued after Apple acquired the team in early 2025 (GeekWire). Don’t design the decide layer around a SaaS that no longer exists.
- Evidently: Pin 0.7.21. The self-hosted library is free under Apache 2.0; the hosted Cloud advertises a free tier, but published quotas aren’t itemized, so don’t hard-code Cloud limits into your spec.
Step 3: Wire the Layers in Dependency Order
Build order is not cosmetic. Each layer consumes the output of the one before it, so the wrong order produces a component the AI can’t finish because its inputs don’t exist yet.
Build order:
- Capture first — the reference snapshot and the production logger. Foundational, no dependencies. Until both datasets exist and share a schema, nothing downstream can run.
- Univariate drift detection next — it depends on capture handing it two aligned datasets. Get single-feature drift working and readable before you add complexity.
- Performance estimation after that — NannyML’s estimator fits on the reference data, then scores the captured production stream. It depends on a clean capture layer and a fitted reference.
- The decide layer last — it integrates the drift signal and the performance estimate into one action. It can’t be built until both upstream signals exist to combine.
For each component, your context must specify:
- What it receives (inputs)
- What it returns (outputs)
- What it must NOT do (constraints — e.g., the detector must not retrain anything; that’s the decide layer’s job)
- How to handle failure (a dropped field in capture should fail loud, not pass an empty frame downstream)
Keep the boundaries hard. The detector reports; it does not act. The estimator scores; it does not alert. Every layer needs its inputs before it can run, and a clean interface between them is what lets you swap a tool later without rewriting the pipeline.
Step 4: Validate Against Synthetic Drift
A monitor you never tested is not a monitor — it’s a dashboard you hope is right. You validate a drift pipeline by feeding it drift you control and confirming it reacts the way the contract promised.
Validation checklist:
- Inject known drift — shift a numerical feature by several standard deviations and rerun. Failure looks like: the report still says “no drift,” which means the wrong test or too loose a threshold.
- Run a no-drift control — feed the detector a fresh resample of the reference data, same distribution. Failure looks like: features trip the alarm anyway, which means your threshold is too tight or your sample is too small to be stable.
- Backtest the performance estimate — on a holdout where you do have labels, compare NannyML’s estimate to real accuracy. Failure looks like: the estimate stays flat while true accuracy falls, which means decay outside the estimator’s calibrated range.
- Check alert behavior — confirm a single genuine shift produces one alert, not one per batch. Failure looks like: the same drift event firing every run, training your team to ignore the channel.
Common Pitfalls
| What You Did | Why AI Failed | The Fix |
|---|---|---|
| Compared production to a frozen training snapshot forever | The baseline never absorbs legitimate seasonal change, so it alarms constantly | Specify a reference window policy — fixed or rolling — in the contract |
| Ran one statistical test on every column | A continuous test on a categorical feature produces a meaningless score the report still prints | Map each feature type to its test explicitly |
| Alerted on drift alone | Drift fired while the model was fine, so the team muted the channel | Gate alerts on estimated performance impact, not raw distribution distance |
| Put a BSL-licensed detector straight into production | The tool blocks production use without a paid license you never budgeted for | Verify the license tier before the tool reaches prod |
Pro Tip
Drift is a leading indicator; decay is the thing you actually care about. The discipline that separates a useful monitor from a noisy one is simple: tie every alert to an estimated impact on model performance. If a feature drifts but your performance estimate holds, that’s logged context, not a page. If the estimate drops, that’s an alert even when every individual feature looks calm. Specify that gate once and you spend your attention on the failures that cost you something.
Frequently Asked Questions
Q: How to build a data drift monitoring pipeline step by step? A: Decompose it into three layers: capture (reference snapshot plus production logging), detect (a drift test plus a label-free performance estimate), and decide (alerting and retraining triggers). Build in dependency order. Watch the schema-alignment step between capture and detect — one renamed field there silently breaks every downstream score.
Q: How to detect data drift with Evidently AI? A: Evidently runs built-in drift tests and auto-selects by column type and data volume, comparing a reference dataset to current production data through its Reports and Test Suites. Override that on features you have an opinion about — it can switch tests as volume grows, changing what a verdict means.
Q: When should you retrain a model based on drift detection? A: Retrain when your performance estimate drops below your threshold, not when a feature distribution moves. Drift alone warrants investigation; measured decay is the reason to act. Confirm the drop is sustained over several windows — a single noisy batch can fake a dip and burn a costly retrain.
Your Spec Artifact
By the end of this guide, you should have:
- A three-layer map of your pipeline — capture, detect, decide — with the inputs and outputs of each layer named
- A drift contract: reference window policy, per-feature-type test mapping, thresholds, label-availability fact, scope, and pinned versions
- A validation plan: injected-drift test, no-drift control, performance backtest, and alert-frequency check
Your Implementation Prompt
Use this in your AI coding tool once you’ve filled the brackets with your own values. Every placeholder maps to a line in your Step 2 contract — the prompt is built to refuse the guesswork that produces a green dashboard over a dying model.
Build a data drift monitoring pipeline in three layers. Do not collapse them
into one script. Follow this order and stop at each layer for my review.

CONTEXT (my drift contract):
- Model: [classification OR regression], target = [your target]
- Reference window: [fixed training snapshot OR rolling N-day window]
- Numerical feature test: [Kolmogorov-Smirnov OR Wasserstein]
- Categorical feature test: [PSI OR Jensen-Shannon]
- Drift threshold: [e.g. PSI > 0.2]
- Label availability: [delayed by N days OR never]
- Scope: [univariate per feature OR joint multivariate OR both]
- Pinned versions: Evidently [0.7.21], NannyML [0.13.1]
  (Alibi Detect only if licensed for production)

LAYER 1 — CAPTURE: create the reference snapshot loader and a production
logger that records inputs and predictions with a schema check. Fail loud on
a missing or renamed field; never pass an empty frame downstream.

LAYER 2 — DETECT: run drift tests using my per-feature-type mapping above
(do not auto-select silently — log which test ran on which column). Then add
a label-free performance estimate (CBPE for classification, DLE for
regression). The detector reports only; it must not retrain or alert.

LAYER 3 — DECIDE: gate alerts on the performance estimate crossing my
threshold, NOT on raw drift. Emit one alert per sustained shift, not per
batch. Define the retrain trigger as: [your sustained-decay condition].

VALIDATE: inject [N]-sigma drift into one feature and confirm an alert; run a
no-drift resample control and confirm silence; backtest the performance
estimate against a labeled holdout.
Ship It
You can now tell the difference between a feature that moved and a model that broke — and specify a pipeline that only pages you for the second one. Build the capture layer first, gate alerts on performance, and test the monitor with drift you control before you trust it with drift you don’t.
AI-assisted content, human-reviewed. Images AI-generated. Editorial Standards · Our Editors