How to Build a CNN Image Classifier with PyTorch and Choose Between EfficientNetV2, ResNet, and ConvNeXt in 2026

Table of Contents
TL;DR
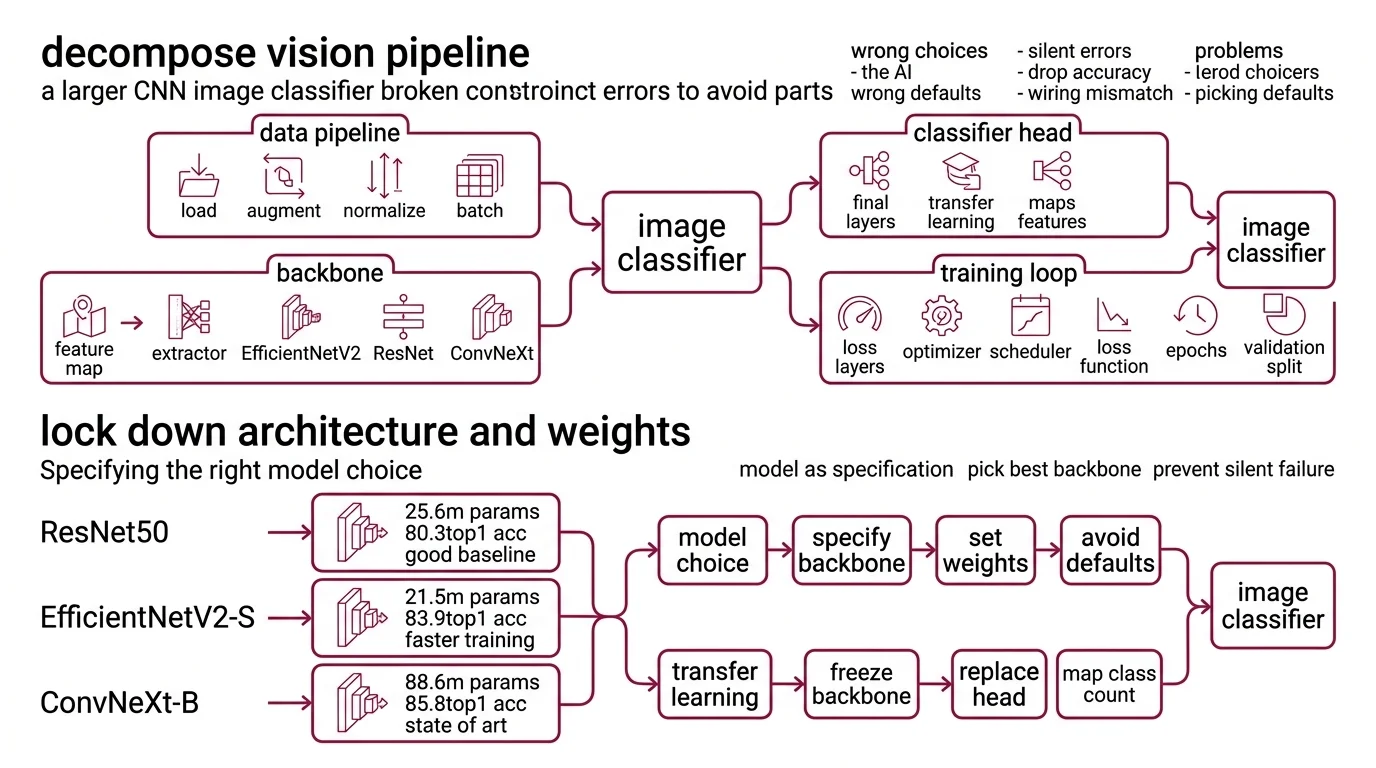
- Decompose before you prompt — data pipeline, backbone, classifier head, and training loop are separate specifications
- Match your pretrained model’s input size and weights API or your accuracy numbers mean nothing
- EfficientNetV2-S wins on accuracy-per-parameter; ResNet50 wins on simplicity; ConvNeXt V2 wins on raw top-1
You opened your AI coding tool, typed “build me an image classifier in
PyTorch,” and got a ResNet50 with pretrained=True. That API has been deprecated since torchvision 0.15 (Torchvision Docs). The model trained. Accuracy looked reasonable. Then you deployed and predictions fell apart — the input preprocessing didn’t match the pretrained weights. Two days gone. The model was never broken. Your specification was.
Before You Start
You’ll need:
- An AI coding tool — Claude Code, Cursor, or Codex
- Working knowledge of Convolutional Neural Network architecture and Neural Network Basics for LLMs
- PyTorch 2.11 and torchvision 0.26 installed (PyTorch PyPI)
- A labeled image dataset with a clear class structure
This guide teaches you: How to decompose a CNN image classifier into spec-ready components so your AI coding tool generates correct, non-deprecated code on the first pass.
The Classifier That Shipped Broken
Here’s what happens when you skip decomposition. You type “build me a CNN image classifier” into Cursor. It generates 80 lines of PyTorch. Looks clean. Runs without errors. But the model loads ResNet50 with the old pretrained=True flag. Input images get resized to 224x224 when your chosen backbone expects 384x384.
Batch Normalization statistics from ImageNet don’t align with your domain.
It worked in your notebook on Tuesday. On Friday, you swapped the backbone to EfficientNetV2 and accuracy dropped to chance — because preprocessing was still wired to ResNet.
The AI tool wrote valid Python. It just didn’t write the right classifier, because your prompt never specified what “right” means.
Step 1: Decompose Your Vision Pipeline
A CNN image classifier is not one thing. It’s four things pretending to be one file.
Your system has these parts:
- Data pipeline — loading, augmentation, normalization, batching. This is where preprocessing errors hide. Wrong mean/std values here will silently destroy accuracy downstream.
- Backbone — the Feature Map extractor. EfficientNetV2, ResNet, ConvNeXt — each has different input expectations, parameter counts, and accuracy profiles.
- Classifier head — the final fully connected layer that maps features to your class count. This is the part you replace during Transfer Learning.
- Training loop — optimizer, scheduler, loss function, epochs, validation split. Separate concern from the model itself.
The Architect’s Rule: If your prompt merges all four into “build me a classifier,” the AI tool picks defaults for every decision you didn’t make. Those defaults will be wrong for your use case.
Step 2: Lock Down Architecture and Weights
This is where most AI-generated classifiers break. The model choice is a specification, not a vibe.
Three architectures worth specifying in 2026:
ResNet50 — 25.6M parameters, 80.858% ImageNet top-1 with V2 weights (Torchvision Docs). The baseline. Every benchmark compares against it. Residual Connection architecture that’s well understood and fast to train. Pick this when you need a stable reference point or have tight compute constraints.
EfficientNetV2-S — 21.5M parameters, 84.228% top-1 at 384x384 input (Torchvision Docs). Fewer parameters than ResNet50, higher accuracy. The S variant hits a sweet spot for production workloads. The M and L variants push to 85.112% and 85.808% but parameter counts jump to 54.1M and 118.5M respectively.
ConvNeXt — available natively in torchvision 0.26 as Tiny through Large. Tiny sits at 28.6M parameters, 82.52% top-1 (Torchvision Docs). ConvNeXt V2 pushes further — the Huge variant reaches 88.9% top-1 at 650M parameters, though that number comes from the original paper and independent reproduction may vary (HuggingFace Docs). V2 models are available through HuggingFace Transformers, not torchvision.
For architectures beyond these three, timm provides access to over 100 model families (timm PyPI), though its compatibility with PyTorch 2.11 has not been explicitly confirmed.
Your context must include:
- Architecture name and variant — not just “use EfficientNet,” specify S, M, or L
- Input resolution — 224x224 for ResNet, 384x384 for EfficientNetV2-S
- Weights API:
weights="IMAGENET1K_V1"— neverpretrained=True - Number of output classes
- Whether to freeze backbone layers during initial training
The Spec Test: If you don’t specify input resolution, the AI tool defaults to 224x224. EfficientNetV2-S was trained at 384x384. Your accuracy drops and you won’t know why.
Step 3: Wire the Build Order
Order matters. Same reason you pour the foundation before framing walls — the data pipeline sets constraints for everything built on top of it. If your AI tool generates the training loop before the data pipeline exists, it invents a data loader with assumptions you didn’t approve.
Build order:
- Data pipeline first — because every other component depends on it. Specify: image directory structure, augmentation transforms, normalization values matching your backbone’s pretrained statistics, batch size, train/val split ratio.
- Model instantiation second — because it depends on the data pipeline’s output shape. Specify: backbone, pretrained weights enum, number of classes, which layers to freeze.
- Training loop third — because it depends on both data and model. Specify: optimizer (AdamW is the current default), learning rate and scheduler, number of epochs, loss function, device.
- Evaluation last — because it validates everything above. Specify: metrics (top-1, top-5, per-class), confusion matrix output, inference latency target.
For each component, your context must specify:
- What it receives (image paths, tensors, predictions)
- What it returns (batched tensors, loss values, accuracy metrics)
- What it must NOT do (no data leakage between train and val, no deprecated APIs)
- How to handle failure (corrupted images, CUDA out-of-memory)
Step 4: Validate Before You Deploy
Running the training script is not validation. A classifier can train to high accuracy and still be broken.
Validation checklist:
- Weights loaded correctly — failure looks like: accuracy at chance level on first epoch. Cause: classifier head dimensions don’t match the backbone’s output features.
- Preprocessing matches backbone — failure looks like: accuracy plateaus well below published benchmarks. Cause: normalization values don’t match what the backbone was pretrained with.
- No data leakage — failure looks like: validation accuracy suspiciously close to training accuracy. Cause: augmented copies of the same image in both splits.
- Inference speed — failure looks like: model works in batch but can’t serve single images fast enough. Cause: backbone too large for your deployment target.
Common Pitfalls
| What You Did | Why AI Failed | The Fix |
|---|---|---|
| “Build me a CNN classifier” | Too many unspecified decisions | Decompose into 4 components, specify each |
Used pretrained=True | Deprecated API still in AI training data | Specify weights="IMAGENET1K_V1" explicitly |
| Swapped backbone, kept preprocessing | Input size and normalization mismatch | Tie preprocessing to backbone choice in your spec |
| Skipped class count | AI defaults to ImageNet’s 1000 classes | State exact number of output classes |
| Mixed torchvision and timm APIs | Different weight loading patterns | Pick one model zoo per project and specify it |
Pro Tip
The most transferable skill here is not knowing which model to pick. It’s knowing which decisions your prompt silently delegates. Every parameter you don’t specify is a parameter the model guesses. Some guesses are fine. Input resolution is not one of them.
Frequently Asked Questions
Q: How to build a convolutional neural network image classifier in PyTorch step by step in 2026?
A: Decompose into four components: data pipeline, backbone, classifier head, training loop. Specify each separately using the weights= enum API in torchvision 0.26. Start with the data pipeline — every other component inherits its assumptions. Validate preprocessing separately from model accuracy.
Q: When should you choose a CNN over a vision transformer for a computer vision project in 2026? A: CNNs outperform vision transformers with limited training data or constrained compute (Springer Nature). EfficientNetV2-S trains faster and deploys smaller than a comparable ViT. If your dataset is small and you need fast inference on modest hardware, a CNN is the better starting point. Transformers earn their overhead at larger scale.
Q: How to use transfer learning with pretrained CNN models like EfficientNetV2 and ConvNeXt?
A: Load the backbone with ImageNet weights via weights="IMAGENET1K_V1", freeze all layers except the classifier head, and train on your dataset. Then unfreeze the last few backbone blocks at a reduced learning rate. Critical detail: your normalization values must match the pretrained model’s training statistics, not what seems reasonable for your data.
Q: How to use CNNs for real-time object detection with YOLO and Faster R-CNN? A: YOLO26, released January 2026, removes NMS and targets edge deployment — nano variant hits 40.9 mAP (Ultralytics Docs). Faster R-CNN is in torchvision but still marked Beta (Torchvision Docs). If migrating from YOLO11, your post-processing code needs rewriting. Specify your latency budget and target device in the prompt.
Your Spec Artifact
By the end of this guide, you should have:
- A component map — data pipeline, backbone, classifier head, training loop, each with defined inputs and outputs
- An architecture decision — which backbone, what input size, which weights API, with documented rationale
- A validation checklist — four checks that catch the most common AI-generated classifier failures before deployment
Your Implementation Prompt
Paste this into Claude Code, Cursor, or your AI coding tool. Replace the bracketed values with your project details. The prompt mirrors the decomposition from Steps 1 through 4 — your AI tool generates each component in the correct order.
Build a PyTorch image classifier with these specifications:

DATA PIPELINE:
- Image source: [path to your image directory]
- Class structure: [number of classes] classes, organized as [directory-per-class or CSV manifest]
- Augmentation: RandomResizedCrop to [input resolution matching backbone], RandomHorizontalFlip, normalize with backbone-specific mean/std
- Batch size: [your batch size]
- Train/val split: [your split ratio]
- Handle corrupted images gracefully — skip and log, do not crash

MODEL:
- Backbone: [EfficientNetV2-S | ResNet50 | ConvNeXt-Tiny] from torchvision
- Pretrained weights: use weights= enum API (NOT pretrained=True)
- Replace classifier head with Linear layer for [number of classes] outputs
- Freeze backbone layers initially

TRAINING:
- Optimizer: AdamW, lr=[your learning rate]
- Scheduler: CosineAnnealingLR
- Loss: CrossEntropyLoss
- Phase 1: [epochs] epochs with frozen backbone
- Phase 2: [epochs] epochs with last [N] blocks unfrozen, lr reduced by [reduction factor]
- Device: [cuda | mps | cpu]

VALIDATION:
- Report top-1 and top-5 accuracy per epoch
- Generate confusion matrix after final epoch
- Measure single-image inference latency
- Verify classifier head output dimensions match class count
Ship It
You now have a decomposition framework for CNN image classifiers that works with any AI coding tool. The model choice matters less than the specification quality — EfficientNetV2-S, ResNet50, or ConvNeXt all perform well when the preprocessing, weights API, and validation checks are locked down. Specify first. Prompt second.
AI-assisted content, human-reviewed. Images AI-generated. Editorial Standards · Our Editors